Chocolate Chip Cookie Cake

Chocolate Chip Cookie Cake | Kathy's Kitchen Table

Chocolate Chip Cookie Cake | Kathy's Kitchen Table

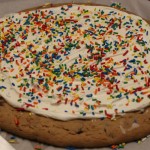
This Chocolate Chip Cookie Cake is so fun! It’s fun to make, decorate and serve! I was nervous the first time I made a cookie cake. I guess I was thinking that it would be so much harder than it actually was to make. But, it is so easy to make! If you can mix cookie dough and shape it into a circle, which is super easy, then you can make a cookie cake! It is fun to decorate. I’m not much of a decorator. My mother-in-law gave me her set of tools but I do not have the eye or the hand to make things look cute on a cake. But this cookie cake is so easy to decorate. All you need to do is spread a layer of frosting over it and add sprinkles, and you have made a very nice looking cookie cake! This Chocolate Chip Cookie Cake is fun to serve because it is not something people make at home often. Sure, you can buy them at the mall or even at the grocery store, but when it takes all of 15 minutes to put together, why not just make it at home? This cookie cake is soft and chewy with lots of chocolate chips! [Read more...]

Peanut Butter Fingers

Peanut Butter Fingers | Kathy's Kitchen Table

Peanut Butter Fingers | Kathy's Kitchen Table

This recipe for Peanut Butter Fingers is from our dear friend, Robin. My kids call her Nan. She is our “adopted” family away from family. I’m not really sure what we would do without her. I know one thing, we would not have today’s incredible recipe if it were not for Robin. When she first made these bars we felt like she had been holding out on us. They were incredible and she had not shared these with us in the last 7 years! What?! Oh, but once she shared the recipe with us, I have been making up for lost time.

I have had made these Peanut Butter Fingers over and over and over again. They are quick, easy and a huge hit with everyone. I mean, it’s chocolate and peanut butter! The base to these bars is just like a giant peanut butter oatmeal cookie. When you bake it, the edges and bottom layer gets nice and crisp. Then it is topped with chocolate chips and a peanut butter sugar glaze. It is sweetness overload! But in a good way! You cannot stop eating them. I think this is called Peanut Butter Fingers is because you cannot keep your fingers out of the pan! My kids kept reaching their little hands over the top of the table for more. I kept cutting tiny little pieces (because if they are tiny, the calories don’t add up, right?).

I hope I have convinced you to give these Peanut Butter Fingers a try. And make sure you share them with a friend and a big glass of milk!

Peanut Butter Fingers | Kathy's Kitchen Table

Print
Peanut Butter Fingers
 

Ingredients
  • ½ cup butter, softened
  • ½ cup sugar
  • ½ cup brown sugar
  • 1 egg
  • ⅓ cup peanut butter
  • ½ teaspoon salt
  • ½ teaspoon baking soda
  • ½ teaspoon vanilla
  • 1 cup quick cooking oatmeal
  • 1 cup flour
  • 1 cup chocolate chips
  • For the Peanut Butter Glaze:
  • 1 cup powdered sugar
  • ¼ cup peanut butter
  • 2 – 4 tablespoons evaporated milk (regular milk works fine, too)

Instructions
  1. Preheat the oven to 350 degrees F. Grease an 11×7 (a 9×9 would work, too) pan and set aside.
  2. In a large bowl, cream together the butter, guars, egg, peanut butter, salt and vanilla. Add in the flour, baking soda and oatmeal. Stir until well mixed.
  3. Spread into the prepared pan and bake for 20 minutes.
  4. Immediately after the cookie is done, sprinkle the chocolate chips on the top. Let sit for about minutes to melt and then spread around the peanut butter cookie.
  5. To make the peanut butter glaze, in a small bowl, combine powdered sugar, peanut butter and evaporated milk. Mix to combine, adding more milk if needed.
  6. Drizzle the mixture over the top.
  7. Let cool and cut into bars.

Recipe Source: Robin A.

Linked to: Buns in my Oven, Mom on Timout, Back for Seconds Social, Tidy Mom, Weekend Potluck and Chef-in-Training

Strawberry Cream Cheese Coffee Cake

Strawberry Cream Cheese Coffee Cake | Kathy's Kitchen Table

Strawberry Cream Cheese Coffee Cake | Kathy's Kitchen Table

Welcome to Strawberry Week at Kathy’s Kitchen Table! I have three great recipes to share with you that all feature strawberries as the star ingredient. Today we start off the week with a wonderful Strawberry Cream Cheese Coffee Cake. This cake has so many different flavors and textures, it will be like a party in your mouth! To start, the cake is dense and full of flavor but does not over power the cheesecake layer or the strawberries. The cream cheese middle is like a light cheesecake that is surrounded by the dense cake layer; it is light and tangy. The strawberry layer is sweet and almost jam-like in its texture. The top crumb topping is sweet and buttery! [Read more...]

Whole Wheat Chocolate Chip Cookies

Whole Wheat Chocolate Chip Cookies | Kathy's Kitchen Tabl

Whole Wheat Chocolate Chip Cookies | Kathy's Kitchen Table

Our whole family enjoys these Whole Wheat Chocolate Chip Cookies. Especially my husband. This is his cookie recipe. He wrote the recipe down years ago and has been making them ever since. They are chewy with quite a bit of texture. He uses mini chocolate chips which I love because you get chocolate in each bite! These cookies are crispy on the edges and soft on the inside. Plus you can feel a little less guilty about eating these because they have oats and whole wheat flour in them. That takes away the guilt of the butter, right? [Read more...]

Chocolate Chip Cake

Chocolate Chip Cake | Kathy's Kitchen Table

Chocolate Chip Cake | Kathy's Kitchen Table


This Chocolate Chip Cake has made its appearance in my kitchen 5 times in the last month. Every single time I make it, the cake gets devoured before I am able to take a picture of it. This time, I made the cake with plenty of time to let it cool down enough to cut a couple of pieces to take a picture. So, if making it 5 times in a short amount of time is any indication as to how good this cake is, then, I don’t know what is.

You probably have everything in your kitchen already to make this cake. Don’t you love recipes like that? I sure do! It’s easy to mix together. The batter gets layered between cinnamon and sugar and chocolate chips. I would consider this a dessert cake, but I wouldn’t judge if you ate it for breakfast with a cup of coffee or milk!

IMG_0300


IMG_0306


IMG_0328


IMG_0367

5.0 from 1 reviews

Print
Chocolate Chip Cake
 

A moist, light cake with a hint of cinnamon and sprinkled with chocolate chips.
Ingredients
  • 3 cups flour
  • 2¼ teaspoons baking powder
  • 1½ teaspoons baking soda
  • ½ teaspoon salt
  • 1 cup sugar
  • ½ cup brown sugar
  • ¾ cup butter
  • 3 eggs
  • 1½ cups sour cream
  • 2 teaspoons vanilla
  • ½ cup sugar
  • 2 teaspoons cinnamon
  • 1½ cup chocolate chips

Instructions
  1. Spray a 9×13 baking dish with non-stick spray and set aside
  2. Preheat the oven to 350 degrees F.
  3. In a bowl, combine the flour, baking powder, baking soda and salt. Set aside.
  4. In the bowl of a stand mixer or a large bowl, cream together 1 cup sugar, brown sugar and butter. Add eggs, sour cream and vanilla. Beat until fluffy. Slowly add the flour mixture and beat until the mixture is combined and light in color, about 2 minutes.
  5. In a small bowl, mix together ½ cup sugar and cinnamon.
  6. Spread half of the batter into the baking dish. Sprinkle with half of the cinnamon sugar mixture. Top with half of the chocolate chips. Repeat with the remaining batter. The mixture will be thick, so be care as you spread the batter over the chocolate chips. Top the batter with the remaining cinnamon sugar and chocolate chips.
  7. Bake for 30-35 minutes or until a toothpick inserted in the middle of the cake comes out clean.

Recipe Source: Cooking During Stolen Moments

Linked to: Mom on Timeout, Chef-in-Training, Back for Seconds Social, Cheerios and Lattes and Weekend Potluck


Chocolate Mint Skillet Brownie

Chocolate Mint Skillet Brownie

Chocolate and mint are one of my favorite flavor combinations. Well, besides chocolate and peanut butter, that is. When I saw this on Pinterest, I knew I wanted to make it for my birthday. Well, that never happened. Instead, I made it for our teens and it was gone in a flash! [Read more...]

Chocolate Peanut Butter Pie

Chocolate Peanut Butter Pie | Kathy's Kitchen Table

Chocolate Peanut Butter Pie

Do you know what today is? It’s Pi Day! That’s right. March 14th (3.14) is known as Pi Day. And what better way to celebrate it than with pie!

Do you love chocolate and peanut butter together? Then you will absolutely love this recipe! Every year for my husband’s birthday he requests a chocolate peanut butter pie. I usually always make the same one. Except for the year I was overdue with our daughter and resorted to the boxed version. I have made a lot of chocolate peanut butter pies over the years. Sometimes I like to change it up and try a new recipe. So, this year for his birthday I was brave and decided to try a new one.

This is the best one yet! It is incredibly decadent, rich and thick. It has the perfect amount of chocolate to peanut butter ratio. Oh! And there is ganache! I love ganache! Anything with ganache is going to be good!

This recipe was fairly easy to make. I was able to make it the night before in several stages, so know that it can be made ahead of time! We like to keep things simple but feel free to garnish it with peanuts and extra chocolate swirls.

Chocolate Peanut Butter Pie 2

Chocolate Peanut Butter Pie 

yields: 8-10 slices

Chocolate Crust

4 tablespoons butter, cut into pieces
8 ounces chocolate teddy grahams, finely ground (2 cups)

Peanut Butter Filling
8 ounces cream cheese, softened
1 cup peanut butter
1/2 cup sugar
2 teaspoons vanilla extract
1 cup heavy cream
kosher salt

Chocolate Topping
4 ounces semisweet or bittersweet chocolate (I used chips)
1/2 cup heavy cream

Directions:

To make the crust, preheat the oven to 375 degrees F. Melt the butter and stir into the teddy graham crumbs. Press the crumbs onto a greased 9 inch spring form pan, making sure to spread evenly onto the bottom and up the sides. Bake the crust for 7-8 minutes or until set. Alternatively, you can place the pan in the freezer for 30-45 minutes until the crust sets.

To make the peanut butter filling, beat the cream cheese, peanut butter, sugar and vanilla in a large bowl with an electric or stand mixer until well blended. In a separate large bowl, whip the cream until stiff peaks are reached. Fold in 1/3 of whipped cream into the peanut butter mixture. Fold in the remaining whipped cream. Spoon the peanut butter filling into the crust. Sprinkle lightly with kosher salt and refrigerate until set or overnight.

To make the chocolate topping, place the chocolate in a bowl. Heat the cream over medium heat until lightly simmering. Pour the cream over the chocolate and let sit for a couple of minutes. Stir until combined and thick and glossy.

Pour the chocolate topping over the peanut butter filling and refrigerate until set, about 1 hour. Serve.

Leftover tip: This pie keeps well in the refrigerator. However, ours did not last more than 3 days so I cannot say how long it will keep.

Recipe Source: slightly adapted from Jessie Monds

“Join the Pi Day Pie Party with Crazy for Crust and enter to win some fabulous prizes!”

I’m sharing this  at FESTIVE FRIDAY FIESTA

Strawberry Icebox Cake

Strawberry Icebox Cake

I am ready for spring. I am ready for flowers, warm weather, sunshine and playing outside with my kids. Strawberries are the fruit I most associate with Spring. We always try to pick strawberries in the spring. The kids love it and then we always get a ton of strawberries to eat plain, usually on the drive home, and to bake with. When I saw this recipe on I knew I needed to make it. I have been finding pretty good tasting strawberries in the grocery store so I thought I would give it a try. This cake is easy to prepare. It also is fast and delicious. There is ganache on top of the cake! Can it get any better than that? And it tastes like spring. I cannot wait to see what this cake will taste like with fresh picked strawberries. [Read more...]

Peanut Butter Chocolate Chip Cake

Peanut Butter Chocolate Chip Cake

Stephen asked to make a cake last week. He has always enjoyed baking and cooking with me. However, lately he has had no interest in helping me in the kitchen. So, when he asked to make a cake, I jumped on the opportunity. I wanted something easy since my 4 year old would be helping me. I am a big fan of easy! Once I got out all the ingredients to make the cake, I told Stephen I was ready for him to help me. He comes into the kitchen and says, “Mom, I’m not going to help make it, I’m just going to help eat it!”

Stephen may not have helped make it, but he sure did help eat it! We all enjoyed this cake. There was not an overly powerful peanut butter taste in this cake. It was just the right amount. There is a crumb topping that adds just the right amount of crunch. And the chocolate chips that are sprinkled on top blend in perfectly with the cake and crumb topping.

If you like the combination of chocolate and peanut butter, give this cake a try!
Chocolate Peanut Butter Chocolate Chip Cake 2

Peanut Butter Chocolate Chip Cake

yields: 9×13 pan

2 1/4 cups flour
2 cups light brown sugar
1 cup creamy peanut butter
1/2 cup butter, softened
1 teaspoon baking powder
1/2 teaspoon baking soda
1 cup milk
1 teaspoon vanilla extract
3 eggs
1 cup semi-sweet chocolate chips

Instructions:

Preheat oven to 350 degrees F. Grease a 9×13 baking pan with cooking spray and set aside.

In a large bowl, combine flour, sugar, peanut butter and butter. Use a stand mixer or electric mixer to combine mixture. Remove 1 cup of the mixture and set aside.

Mix in baking powder and baking soda. Add milk and vanilla. Add eggs 1 at a time, mixing well after each addition.

Pour batter into prepared pan. Sprinkle the top with the reserved cup of flour and peanut butter mixture. Sprinkle chocolate chips on top. Bake for 35-40 minutes, or until a toothpick inserted into the center comes out clean.

Leftover tip: This cake is great warm, right out of the oven but also tastes great several days later.

Recipe Source: Bake or Break