Chocolate Oatmeal Granola Bars

Chocolate Oatmeal Granola Bars | Kathy's Kitchen Table

Chocolate Oatmeal Granola Bars | Kathy's Kitchen Table

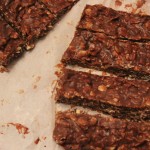
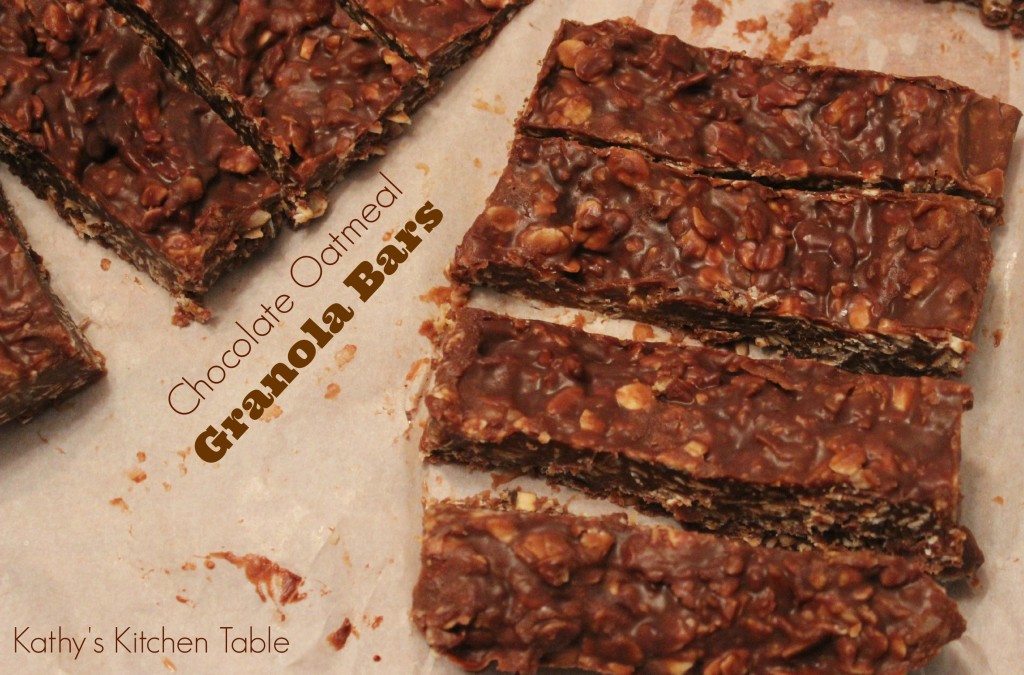
We absolutely love these Chocolate Oatmeal Granola Bars. I have been making them for some time now. They are healthy, delicious and loaded with good for you nutrients that you get from the oats and wheat germ in these bars. These Chocolate Oatmeal Granola Bars are quick and easy to make. The only hard part is letting them chill in the refrigerator.

These bars are great for a sweet tooth, as the chocolate is oh so good! Serve these with a glass of milk and you have  a great, filling afternoon snack or breakfast.

Print
Chocolate Oatmeal Granola Bars
 

Ingredients
  • ½ cup peanut butter
  • ⅓ cup honey
  • ¼ cup butter
  • 1 cup rolled oats
  • 2 tablespoon wheat germ
  • ½ cup coconut
  • ½ cup bittersweet chocolate chips

Instructions
  1. Line an 8×8 or 9×9 baking dish with aluminum foil or parchment paper and set aside.
  2. In a medium saucepan, melt the peanut butter, honey and butter over medium heat, stirring constantly. Turn off the heat when melted.
  3. Stir in the oats, wheat germ and coconut. Stir until combined.
  4. Add in the chocolate. Stir until all the chocolate has melted.
  5. Pour the mixture into the prepared baking dish and place in the refrigerator to chill for 1-2 hours.
  6. Once mixture is firm, turn out onto a cutting board and slice into bars.

 Recipe Source: The Marathon Mom

Peanut Butter Fingers

Peanut Butter Fingers | Kathy's Kitchen Table

Peanut Butter Fingers | Kathy's Kitchen Table

This recipe for Peanut Butter Fingers is from our dear friend, Robin. My kids call her Nan. She is our “adopted” family away from family. I’m not really sure what we would do without her. I know one thing, we would not have today’s incredible recipe if it were not for Robin. When she first made these bars we felt like she had been holding out on us. They were incredible and she had not shared these with us in the last 7 years! What?! Oh, but once she shared the recipe with us, I have been making up for lost time.

I have had made these Peanut Butter Fingers over and over and over again. They are quick, easy and a huge hit with everyone. I mean, it’s chocolate and peanut butter! The base to these bars is just like a giant peanut butter oatmeal cookie. When you bake it, the edges and bottom layer gets nice and crisp. Then it is topped with chocolate chips and a peanut butter sugar glaze. It is sweetness overload! But in a good way! You cannot stop eating them. I think this is called Peanut Butter Fingers is because you cannot keep your fingers out of the pan! My kids kept reaching their little hands over the top of the table for more. I kept cutting tiny little pieces (because if they are tiny, the calories don’t add up, right?).

I hope I have convinced you to give these Peanut Butter Fingers a try. And make sure you share them with a friend and a big glass of milk!

Peanut Butter Fingers | Kathy's Kitchen Table

Print
Peanut Butter Fingers
 

Ingredients
  • ½ cup butter, softened
  • ½ cup sugar
  • ½ cup brown sugar
  • 1 egg
  • ⅓ cup peanut butter
  • ½ teaspoon salt
  • ½ teaspoon baking soda
  • ½ teaspoon vanilla
  • 1 cup quick cooking oatmeal
  • 1 cup flour
  • 1 cup chocolate chips
  • For the Peanut Butter Glaze:
  • 1 cup powdered sugar
  • ¼ cup peanut butter
  • 2 – 4 tablespoons evaporated milk (regular milk works fine, too)

Instructions
  1. Preheat the oven to 350 degrees F. Grease an 11×7 (a 9×9 would work, too) pan and set aside.
  2. In a large bowl, cream together the butter, guars, egg, peanut butter, salt and vanilla. Add in the flour, baking soda and oatmeal. Stir until well mixed.
  3. Spread into the prepared pan and bake for 20 minutes.
  4. Immediately after the cookie is done, sprinkle the chocolate chips on the top. Let sit for about minutes to melt and then spread around the peanut butter cookie.
  5. To make the peanut butter glaze, in a small bowl, combine powdered sugar, peanut butter and evaporated milk. Mix to combine, adding more milk if needed.
  6. Drizzle the mixture over the top.
  7. Let cool and cut into bars.

Recipe Source: Robin A.

Linked to: Buns in my Oven, Mom on Timout, Back for Seconds Social, Tidy Mom, Weekend Potluck and Chef-in-Training

Whole Wheat Chocolate Chip Cookies

Whole Wheat Chocolate Chip Cookies | Kathy's Kitchen Tabl

Whole Wheat Chocolate Chip Cookies | Kathy's Kitchen Table

Our whole family enjoys these Whole Wheat Chocolate Chip Cookies. Especially my husband. This is his cookie recipe. He wrote the recipe down years ago and has been making them ever since. They are chewy with quite a bit of texture. He uses mini chocolate chips which I love because you get chocolate in each bite! These cookies are crispy on the edges and soft on the inside. Plus you can feel a little less guilty about eating these because they have oats and whole wheat flour in them. That takes away the guilt of the butter, right? [Read more...]

Chocolate Chip Cake

Chocolate Chip Cake | Kathy's Kitchen Table

Chocolate Chip Cake | Kathy's Kitchen Table


This Chocolate Chip Cake has made its appearance in my kitchen 5 times in the last month. Every single time I make it, the cake gets devoured before I am able to take a picture of it. This time, I made the cake with plenty of time to let it cool down enough to cut a couple of pieces to take a picture. So, if making it 5 times in a short amount of time is any indication as to how good this cake is, then, I don’t know what is.

You probably have everything in your kitchen already to make this cake. Don’t you love recipes like that? I sure do! It’s easy to mix together. The batter gets layered between cinnamon and sugar and chocolate chips. I would consider this a dessert cake, but I wouldn’t judge if you ate it for breakfast with a cup of coffee or milk!

IMG_0300


IMG_0306


IMG_0328


IMG_0367

5.0 from 1 reviews

Print
Chocolate Chip Cake
 

A moist, light cake with a hint of cinnamon and sprinkled with chocolate chips.
Ingredients
  • 3 cups flour
  • 2¼ teaspoons baking powder
  • 1½ teaspoons baking soda
  • ½ teaspoon salt
  • 1 cup sugar
  • ½ cup brown sugar
  • ¾ cup butter
  • 3 eggs
  • 1½ cups sour cream
  • 2 teaspoons vanilla
  • ½ cup sugar
  • 2 teaspoons cinnamon
  • 1½ cup chocolate chips

Instructions
  1. Spray a 9×13 baking dish with non-stick spray and set aside
  2. Preheat the oven to 350 degrees F.
  3. In a bowl, combine the flour, baking powder, baking soda and salt. Set aside.
  4. In the bowl of a stand mixer or a large bowl, cream together 1 cup sugar, brown sugar and butter. Add eggs, sour cream and vanilla. Beat until fluffy. Slowly add the flour mixture and beat until the mixture is combined and light in color, about 2 minutes.
  5. In a small bowl, mix together ½ cup sugar and cinnamon.
  6. Spread half of the batter into the baking dish. Sprinkle with half of the cinnamon sugar mixture. Top with half of the chocolate chips. Repeat with the remaining batter. The mixture will be thick, so be care as you spread the batter over the chocolate chips. Top the batter with the remaining cinnamon sugar and chocolate chips.
  7. Bake for 30-35 minutes or until a toothpick inserted in the middle of the cake comes out clean.

Recipe Source: Cooking During Stolen Moments

Linked to: Mom on Timeout, Chef-in-Training, Back for Seconds Social, Cheerios and Lattes and Weekend Potluck


Peanut Butter Chocolate Chip Muffins

IMG_3682

Chocolate Chip Peanut Butter Muffins | Kathy's Kitchen Table

Peanut butter and chocolate are one of the world’s greatest food combinations, right? You probably mainly eat it for dessert, as in things like this pie. With these muffins you can enjoy them for breakfast. So you can get your peanut butter and chocolate fix first thing in the morning! This recipe is easy. No mixer required. Just 2 bowls, a spoon and some arm power for stirring.

These muffins are large. You fill the muffin cups all the way to the top so that you get a nice large dome, reminiscent of something you would find at your local bakery or coffee shop. The peanut butter is is not overwhelming while the muffin itself is not overly sweet. It is a nice way to begin your day. Or perfect for your afternoon with a cup of tea or coffee.

Chocolate Peanut Butter Muffins | Kathy's Kitchen Table

Peanut Butter Chocolate Chip Muffins

yields: 12 muffins

Ingredients:

2 1/4 cups flour
2 teaspoons baking powder
1/2 teaspoon salt
6 tablespoons butter, melted and cooled
2/3 cup light brown sugar
1/2 cup peanut butter
2 eggs
1 cup milk
1 teaspoon vanilla extract
1 cup chocolate chips

Directions:

Preheat oven to 375 degrees F. Grease a muffin pan with cooking spray or line with paper liners and set aside.

In a medium or large size bowl, whisk together the flour, baking powder and salt. In a separate bowl, whisk together the butter, brown sugar, peanut butter, eggs, mlk and vanilla. The mixture will probably not be smooth, and that’s ok. Pour the wet ingredients into the dry ingredients and stir until combined, being careful not to over-stir. Stir in the chocolate chips. Fill each muffin cup to the top. Bake for 18-20 minutes, or until a toothpick comes out clean and the muffins are golden brown and delicious. Cool slightly before serving.

Leftover tip: These muffins keep for about 1-2 days at room temperature before drying out. They are best eaten within 24 hours. Although, ours did not last that long!

Recipe Source: The Galley Gourmet

Linked to: Chef-in-Training

Chocolate Mint Chocolate Cookies

Chocolate Mint Chocolate Cookies

These cookies made an appearance at our house and for youth group just in time for St. Patrick’s day! Are you a fan of the chocolate/mint combo? I am! The great thing about the cookies is that they can be made for both Christmas and St. Patrick’s day. Plus you can change the color of the chocolate dipping and make it for any time of the year! [Read more...]

Chocolate Peanut Butter Pie

Chocolate Peanut Butter Pie | Kathy's Kitchen Table

Chocolate Peanut Butter Pie

Do you know what today is? It’s Pi Day! That’s right. March 14th (3.14) is known as Pi Day. And what better way to celebrate it than with pie!

Do you love chocolate and peanut butter together? Then you will absolutely love this recipe! Every year for my husband’s birthday he requests a chocolate peanut butter pie. I usually always make the same one. Except for the year I was overdue with our daughter and resorted to the boxed version. I have made a lot of chocolate peanut butter pies over the years. Sometimes I like to change it up and try a new recipe. So, this year for his birthday I was brave and decided to try a new one.

This is the best one yet! It is incredibly decadent, rich and thick. It has the perfect amount of chocolate to peanut butter ratio. Oh! And there is ganache! I love ganache! Anything with ganache is going to be good!

This recipe was fairly easy to make. I was able to make it the night before in several stages, so know that it can be made ahead of time! We like to keep things simple but feel free to garnish it with peanuts and extra chocolate swirls.

Chocolate Peanut Butter Pie 2

Chocolate Peanut Butter Pie 

yields: 8-10 slices

Chocolate Crust

4 tablespoons butter, cut into pieces
8 ounces chocolate teddy grahams, finely ground (2 cups)

Peanut Butter Filling
8 ounces cream cheese, softened
1 cup peanut butter
1/2 cup sugar
2 teaspoons vanilla extract
1 cup heavy cream
kosher salt

Chocolate Topping
4 ounces semisweet or bittersweet chocolate (I used chips)
1/2 cup heavy cream

Directions:

To make the crust, preheat the oven to 375 degrees F. Melt the butter and stir into the teddy graham crumbs. Press the crumbs onto a greased 9 inch spring form pan, making sure to spread evenly onto the bottom and up the sides. Bake the crust for 7-8 minutes or until set. Alternatively, you can place the pan in the freezer for 30-45 minutes until the crust sets.

To make the peanut butter filling, beat the cream cheese, peanut butter, sugar and vanilla in a large bowl with an electric or stand mixer until well blended. In a separate large bowl, whip the cream until stiff peaks are reached. Fold in 1/3 of whipped cream into the peanut butter mixture. Fold in the remaining whipped cream. Spoon the peanut butter filling into the crust. Sprinkle lightly with kosher salt and refrigerate until set or overnight.

To make the chocolate topping, place the chocolate in a bowl. Heat the cream over medium heat until lightly simmering. Pour the cream over the chocolate and let sit for a couple of minutes. Stir until combined and thick and glossy.

Pour the chocolate topping over the peanut butter filling and refrigerate until set, about 1 hour. Serve.

Leftover tip: This pie keeps well in the refrigerator. However, ours did not last more than 3 days so I cannot say how long it will keep.

Recipe Source: slightly adapted from Jessie Monds

“Join the Pi Day Pie Party with Crazy for Crust and enter to win some fabulous prizes!”

I’m sharing this  at FESTIVE FRIDAY FIESTA